Unleash Flavor: Your 10-Minute Guide to Blender Vanilla Bean Almond Butter
Ever found yourself staring at exorbitant prices for a small jar of "gourmet" nut butter at the grocery store? You're not alone. The frustration of premium pricing for something you know you could probably make yourself is a common kitchen dilemma. But what if we told you that creating an incredibly delicious, fragrant, and far superior homemade vanilla bean almond butter is not only possible but takes a mere 10 minutes of active time?
Forget those fancy, overpriced jars! This guide will empower you to whip up your own creamy, dreamy vanilla bean almond butter right in your blender, using just three simple ingredients. Prepare to elevate your breakfast, snacks, and baking with a spread that boasts unparalleled freshness and flavor, easily outshining its store-bought counterparts. The journey from whole almonds to velvety smooth perfection is surprisingly quick and deeply rewarding.
Why Homemade Vanilla Bean Almond Butter is a Game Changer
The allure of store-bought convenience often overshadows the immense benefits of making things from scratch. When it comes to nut butters, this couldn't be truer. Here’s why diving into DIY vanilla bean almond butter is a decision you won't regret:
- Unbeatable Freshness and Flavor: There’s simply no comparison to the vibrant, robust taste of freshly made nut butter. The aroma of toasted almonds and intoxicating vanilla bean paste creates a symphony of flavor commercial versions struggle to replicate after sitting on a shelf.
- Cost-Effectiveness: Those "fancy" jars can cost upwards of $10 for a small quantity. By purchasing bulk almonds and a good quality vanilla bean paste, you can produce a much larger volume of premium almond butter for a fraction of the price. Your wallet will thank you!
- Complete Ingredient Control: Ever scrutinize the ingredient list on a store-bought jar, only to find added sugars, hydrogenated oils, or unnecessary preservatives? Making your own puts you in the driver’s seat. You control every single component, ensuring a pure, wholesome product free from unwanted extras. This is a core reason why DIY vanilla bean almond butter beats fancy store jars every single time.
- Customization Potential: While our core recipe focuses on simplicity, the homemade route opens up a world of customization. Want a hint of cinnamon? A touch of maple syrup? A pinch of cayenne for a kick? It’s all within your creative grasp, allowing you to tailor your almond butter to your exact preferences.
The Essential Trio: Ingredients for Perfect Vanilla Bean Almond Butter
The magic of this recipe lies in its elegant simplicity. You truly only need three core ingredients to achieve a luxurious, healthy, and incredibly flavorful vanilla bean almond butter.
1. Roasted Unsalted Almonds
These are, naturally, the star of the show! While you might find pre-roasted, salted almonds at the store, opting for raw unsalted almonds and roasting them yourself is highly recommended. Why? Roasting fresh at home brings out a deeper, richer flavor and aroma that’s crucial for the best nut butter. Plus, it gives you complete control over the salt content.
- How to Roast: Spread raw, unsalted almonds in a single layer on a foil-lined baking sheet (for easy cleanup!). Roast in a preheated oven at 350°F (175°C) for about 8-12 minutes, or until they turn golden brown and become wonderfully fragrant. Keep a close eye on them to prevent burning!
- Cooling is Key: Once roasted, allow your almonds to cool completely to room temperature. Processing warm nuts can release their oils too quickly, potentially leading to a slightly greasier texture, and it can also stress your blender. Patience here pays off!
2. Vanilla Bean Paste
This is where the "vanilla bean" in your vanilla bean almond butter truly shines. Vanilla bean paste offers a richer, more concentrated flavor than standard vanilla extract, often with those beautiful little vanilla specks that hint at its premium quality. It provides an unparalleled depth and aromatic sweetness that elevates the entire spread.
- Why Paste Over Extract? While extract works in a pinch, vanilla bean paste contains real vanilla bean flecks and a more viscous, potent flavor profile. It delivers a more authentic and visually appealing vanilla experience.
- Sourcing: Look for quality vanilla bean paste in baking aisles or specialty stores; it makes a noticeable difference.
3. A Pinch of Salt
Often overlooked, salt is a critical flavor enhancer in nut butters. It doesn't just make things salty; it brightens and balances the natural sweetness of the almonds and deepens the vanilla notes. A tiny bit of salt makes an enormous difference, transforming a potentially bland spread into a truly addictive one.
- Types of Salt: Fine sea salt or Himalayan pink salt are excellent choices.
- Adjusting for Pre-Roasted Almonds: If you absolutely must use pre-roasted, salted almonds, significantly reduce or even omit the added salt in this recipe. Taste as you go!
Your Blender, Your Best Friend: The Transformation Process
Turning those three simple ingredients into a luxurious vanilla bean almond butter is surprisingly hands-off, thanks to the power of your blender (or food processor!). The key is patience and a capable machine.
Choosing the Right Equipment
For the smoothest, creamiest result, a high-speed blender or a powerful food processor is essential. Modern blenders with strong motors and sharp blades are ideal because they can run for the necessary 10 minutes without overheating, efficiently breaking down the almonds.
- Blender vs. Food Processor: While high-speed blenders often yield the creamiest texture, a powerful food processor with a wide base can also do an excellent job.
- Wattage Matters: Look for blenders with higher wattage (1000W+) for optimal performance and less strain on the motor.
The 10-Minute Transformation: Step-by-Step
- Combine Ingredients: Add your completely cooled roasted almonds, vanilla bean paste, and salt to your blender or food processor. Ensure all ingredients are at the bottom of the container.
- Start Processing: Begin blending on a low setting, gradually increasing to high. The almonds will go through several stages:
- Rough Meal (0-2 minutes): Initially, the almonds will break down into a coarse flour or meal.
- Sticky Ball (2-5 minutes): As the natural oils begin to release, the meal will clump together, forming a sticky ball or paste that might stick to the sides of the container.
- Thick Paste (5-8 minutes): Continue processing. The ball will gradually start to break down and become a very thick, somewhat chunky paste. This is often the most challenging stage for your machine, but keep going!
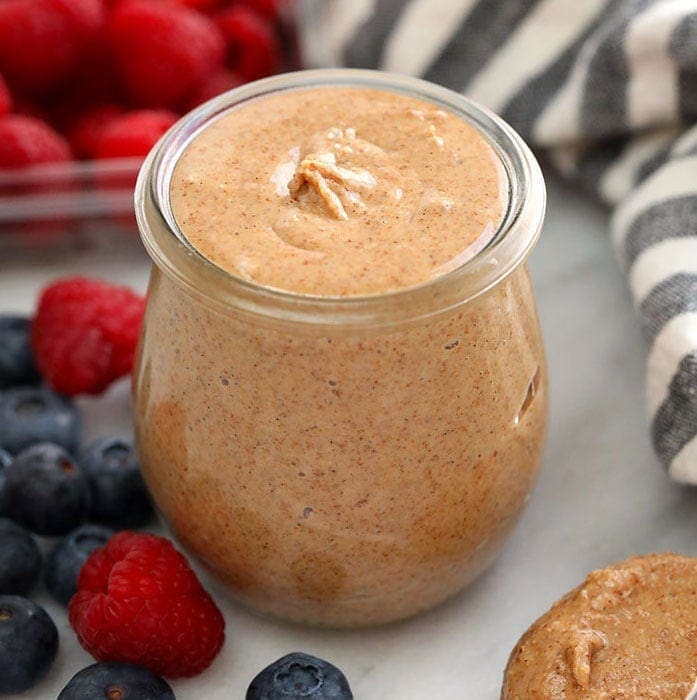
- Creamy Butter (8-10 minutes): With continued blending, the paste will suddenly loosen, becoming a gloriously smooth, pourable (or easily spoonable) vanilla bean almond butter.
- Scrape Down Sides: Periodically, you’ll need to pause your machine and use a rubber spatula to scrape down any almond bits clinging to the sides of the container, ensuring even processing. This is crucial, especially in the earlier stages.
- Taste and Adjust: Once your almond butter reaches your desired consistency, give it a quick taste. If you prefer a bit more salt, add a tiny pinch and blend for another 30 seconds.
Pro Tip: If your blender starts to overheat, give it a 1-2 minute break before continuing. Most modern high-speed blenders are designed to handle this, but it's good practice to be mindful.
Beyond the Basics: Customization & Storage
Now that you've mastered the foundational vanilla bean almond butter, let your culinary creativity soar!
Customization Ideas:
- Sweeteners: Add 1-2 tablespoons of maple syrup, honey, or a date paste for a touch of natural sweetness. Start small and adjust to taste.
- Spices: A pinch of cinnamon, cardamom, or even a tiny amount of nutmeg can add warmth and complexity.
- Chocolate Lover's Dream: Stir in a tablespoon of unsweetened cocoa powder or cacao powder for a chocolatey twist.
- Mixed Nuts: While this recipe focuses on almonds, you can experiment by adding a handful of cashews, pecans, or walnuts to the mix for a unique flavor profile. Remember to roast them alongside your almonds!
- Boost Creaminess: A tiny drizzle (1-2 teaspoons) of a neutral oil like coconut oil or avocado oil can aid in achieving an extra-creamy texture, especially if your nuts aren't releasing enough oil.
Storage and Shelf Life:
Store your homemade vanilla bean almond butter in a clean, airtight jar or container. While it's unlikely to last long once you taste it, it will stay fresh at room temperature in a cool, dark pantry for about 2-3 weeks. For extended freshness, especially in warmer climates, refrigerating it is best, where it can last up to a month or even longer. Keep in mind that refrigeration may cause it to firm up slightly, but it will soften again at room temperature.
Just like store-bought natural nut butters, your homemade version may experience some oil separation. Simply give it a good stir before each use to reincorporate the oils and maintain that luscious texture.
Conclusion: Elevate Your Every Bite
From a simple bag of almonds to a gourmet spread, making your own vanilla bean almond butter is a simple yet profoundly rewarding kitchen adventure. In just 10 minutes, you've unlocked fresh flavor, cost savings, and complete control over what goes into your food. Spread it on toast, swirl into oatmeal, blend into smoothies, or simply enjoy it by the spoonful – once you taste homemade, you'll find it hard to go back. Fire up your blender and savor this luxurious, healthy delight!
